Instructions for using basic to advanced Business Manager (BM) accounts
Writing date: 2023-11-14 01:04:42
These are the basics when shopping at the website and how to use them
Receive BM when buying from the website:
1, When you buy BM on the website, a screen with detailed account information will be displayed. You can check it at "Purchase History"
(1) Purchase History (2) Trading Code (3) See details
illustrating images
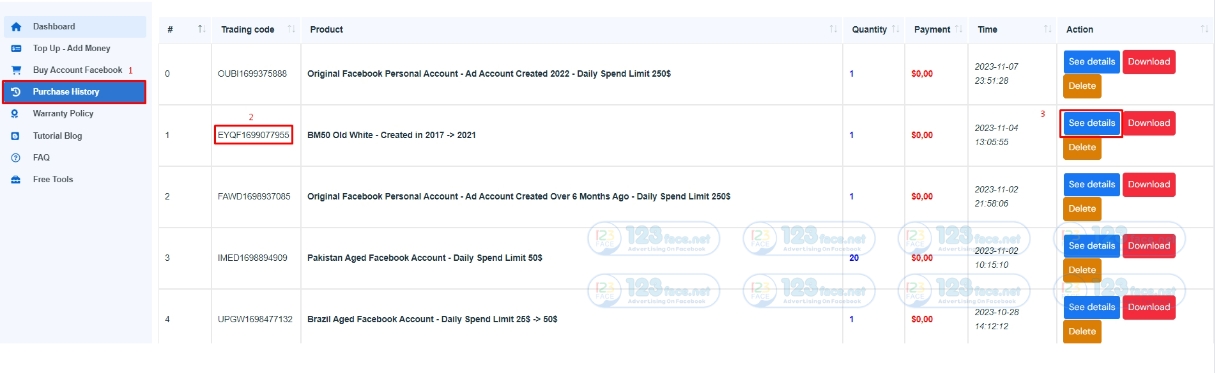
2, Next click "View details" you can see account information.
This is typically the format we provide you when you purchase a business manager account: 3684306561582242|https://fb.me/1Gk193Wq3OCEYAz (1) The number will be the ID of the BM (2) Link to receive BM
illustrating images

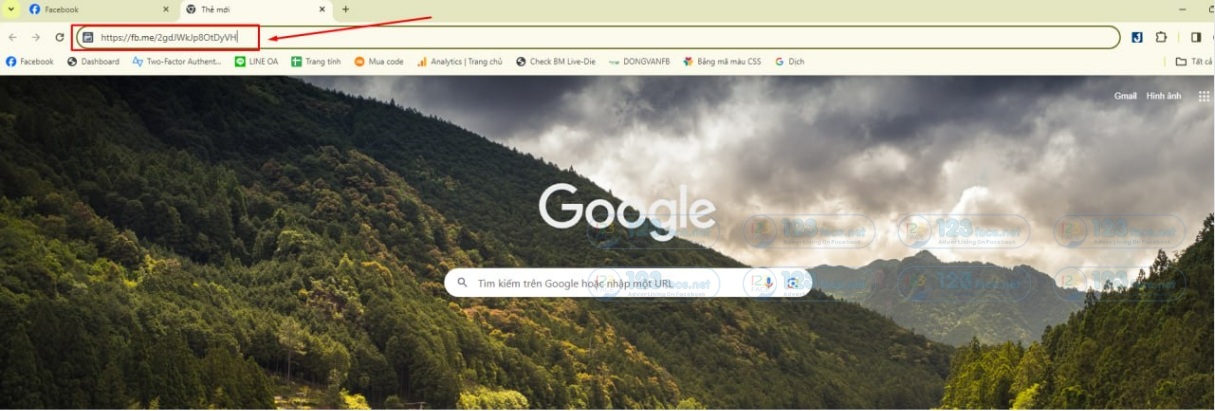
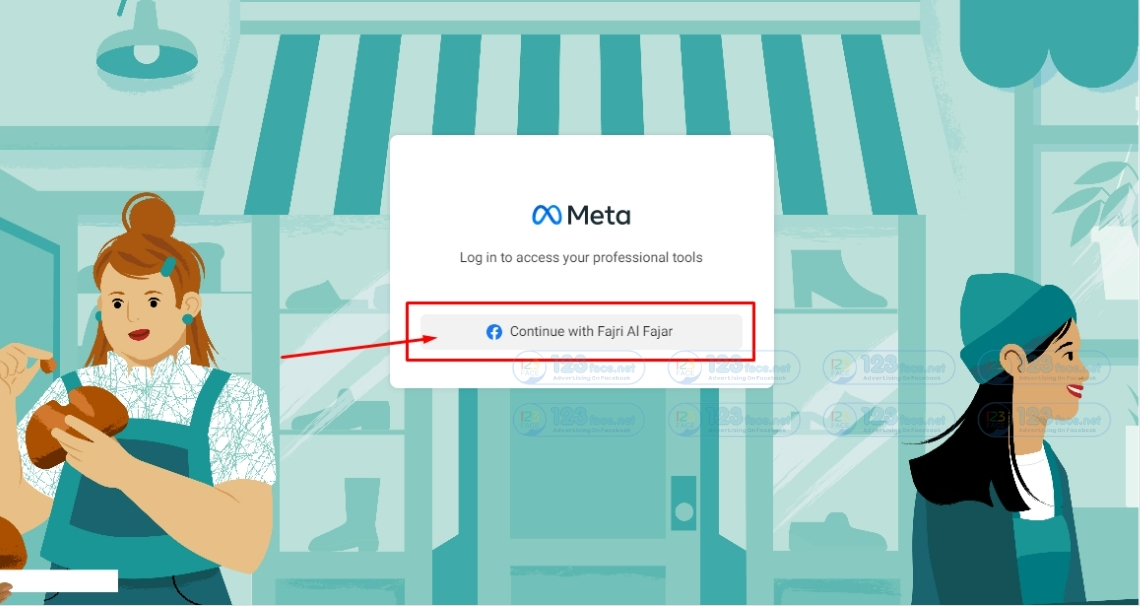
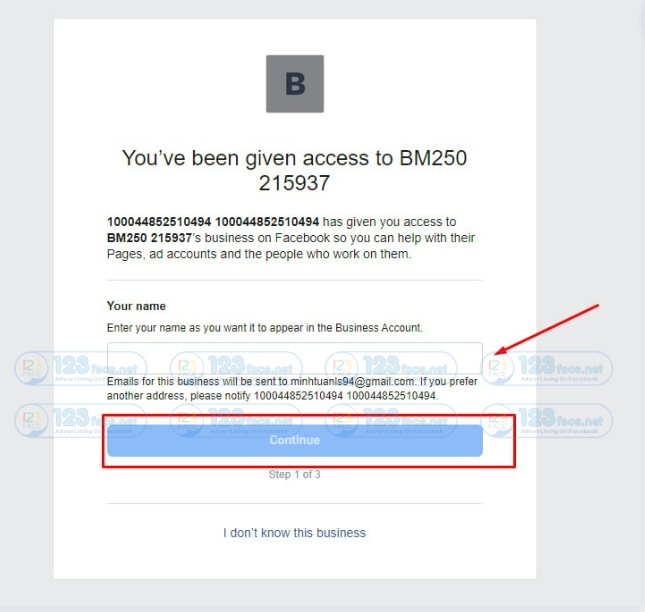
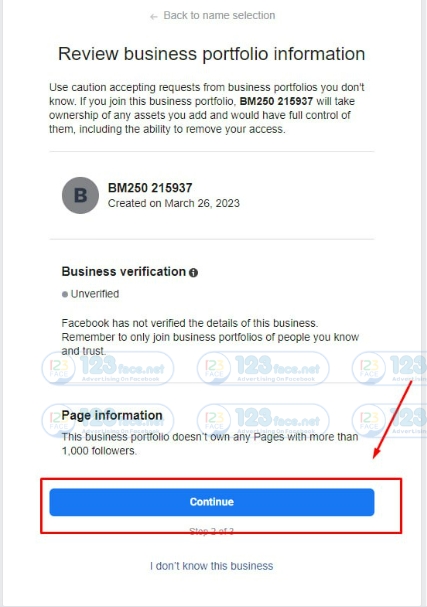
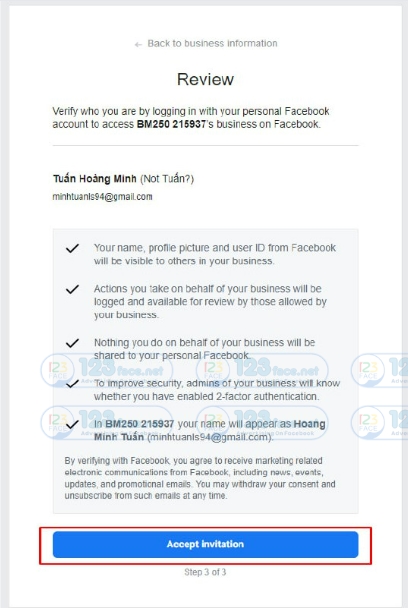
3, First you need to log in to your personal Facebook account to receive the BM you just purchased (Important) ,
You just need to enter this link into a new tab in the browser where you are logged into your profile account, and follow the steps as shown below to receive the BM into your account.
illustrating images
Items of interest in BM:
1, Business Information
- Business Name: The official name of the business.
- About Section: A brief description of what the business offers, its history, or any other relevant information.
- Contact Information: This may include a phone number, email, or other contact methods.
- Location: The physical address of the business, if applicable.
- Hours of Operation: When the business is open to customers.
- Website: A link to the business's official website.
- Services or Menu: For restaurants and service-based businesses, a list of offerings may be provided.
illustrating images

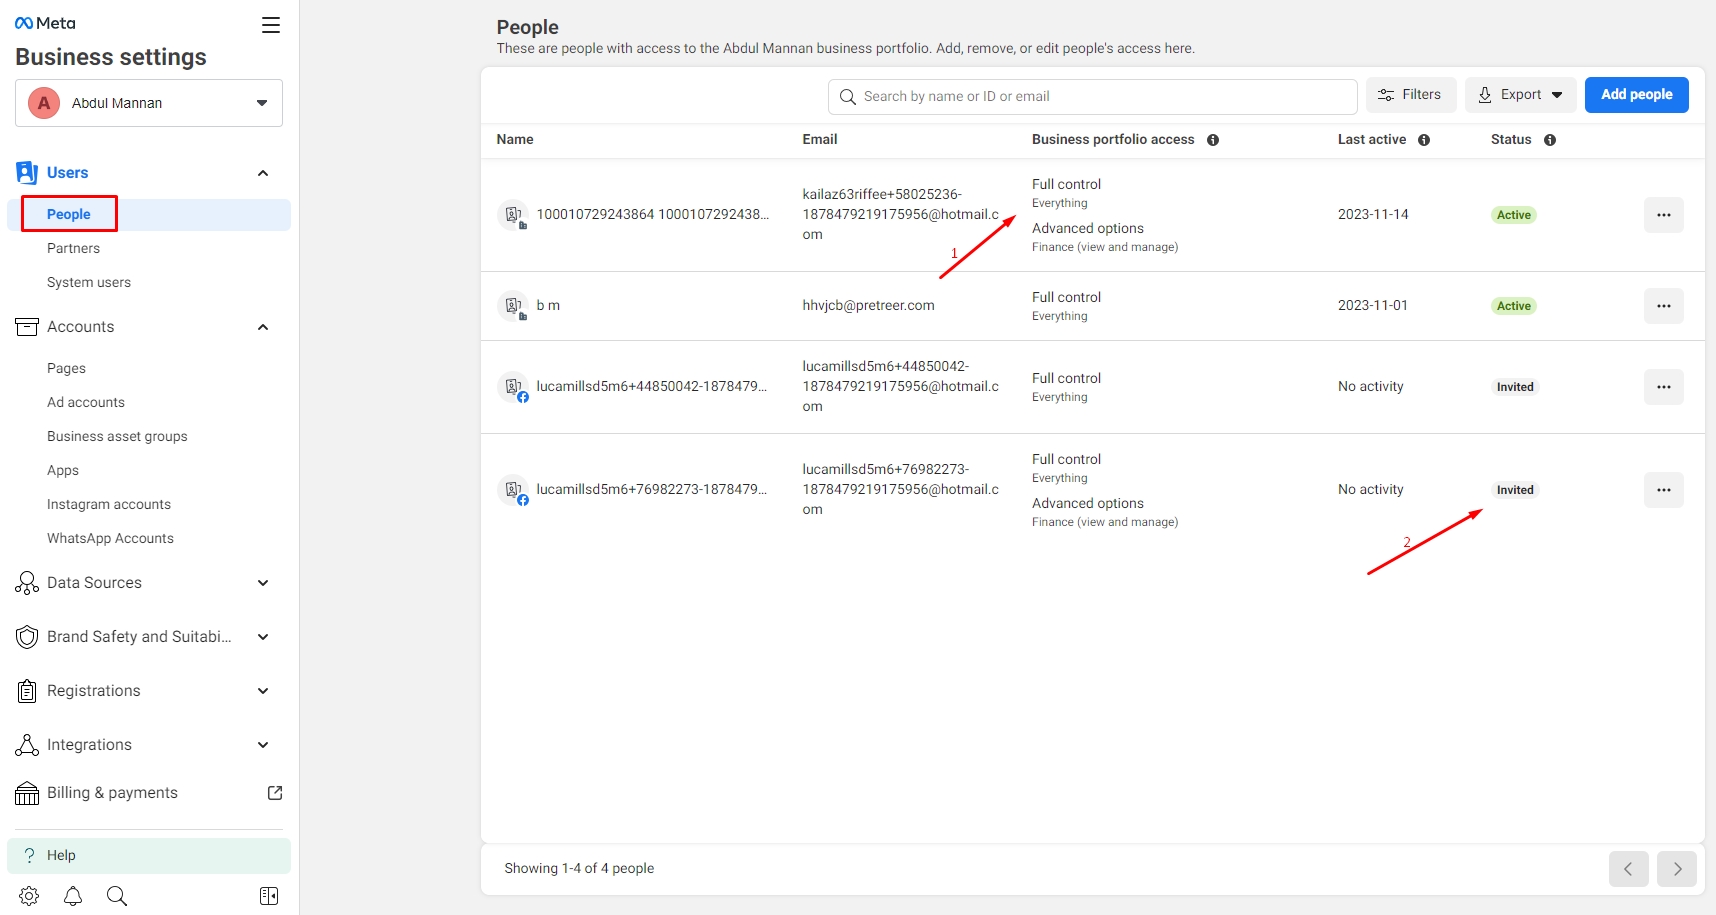
2, People (in 1 BM there should be at least 2-3 or more administrators to increase security better and avoid many bad cases from happening....)
Why Your Facebook Business Manager Should Have Multiple Administrators
Managing a Facebook Business Manager (BM) account is a critical task for any business leveraging Facebook for advertising and engagement. While it may seem convenient to have a single administrator, it's a best practice to appoint 2-3 or more administrators to ensure enhanced security and continuity. Let's explore why multiple administrators in your BM can safeguard your business's social presence and mitigate risks.
Enhanced Security with Multiple Administrators
Shared Responsibility Reduces Risks
- Having multiple administrators means that responsibility for the account is shared. This reduces the risk of account loss if one admin's access is compromised or if they leave the organization.
Continuous Access and Control
- With several admins, your BM account can always be managed without interruption. If one admin is unavailable, others can step in to ensure that the business operations on Facebook continue seamlessly.
Diverse Oversight Prevents Malpractice
- When more eyes are overseeing an account, the chances of unauthorized actions decrease. It creates a system of checks and balances where admins can monitor each other's actions, preventing potential misuse.
Avoiding Bad Cases Before They Happen
Preparation for Unforeseen Circumstances
- Multiple administrators mean that you're prepared for unforeseen circumstances. Whether it’s a security breach or accidental changes, having more admins allows for a quick response to resolve issues.
Safeguarding Against Malicious Acts
- In the unfortunate event that an admin account is hacked, having other admins can help quickly regain control of the account, minimizing damage and restoring normal operations faster.
Best Practices for Admin Roles in Business Manager
Assign Roles Based on Trust and Necessity
- Not everyone needs full admin access. Assign roles based on trust levels and the necessity of the tasks each team member needs to perform.
Regularly Review Admin Activities
- Keep an eye on the activity logs. Regular reviews of what changes are made, and by whom, can help catch any discrepancies early on.
Educate Your Admins on Security Practices
- Ensure all admins are up to date on the latest security practices, including recognizing phishing attempts, securing login credentials, and understanding Facebook's security features like two-factor authentication.
(1) According to the red arrow I marked, those are the people holding administrator rights (Admin). (2) This is an invitation to receive BM
illustrating images
3, Business ad account (create Bm ad account, add people to ad account)
Creating a New Ad Account in Facebook Business Manager
Step 1: Log Into Facebook Business Manager
- Start by logging into your Business Manager at business.facebook.com.
Step 2: Access the Business Settings
- Click on the "Business Settings" icon, usually located in the upper right corner of your Business Manager.
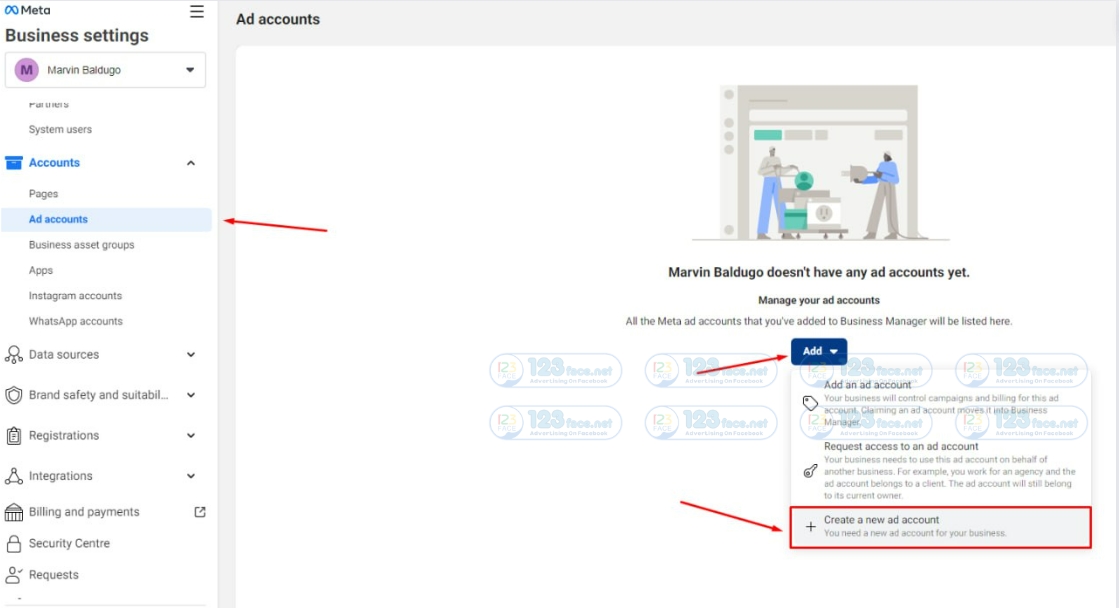
Step 3: Add a New Ad Account
- Inside Business Settings, navigate to the “Accounts” section and click on “Ad Accounts.”
- Click the blue “Add” button and choose “Create a New Ad Account” from the dropdown menu.

Step 4: Set Up Your Ad Account Details
- Fill in the necessary details for your ad account, including its name, advertising on behalf of, time zone, currency, and payment method.
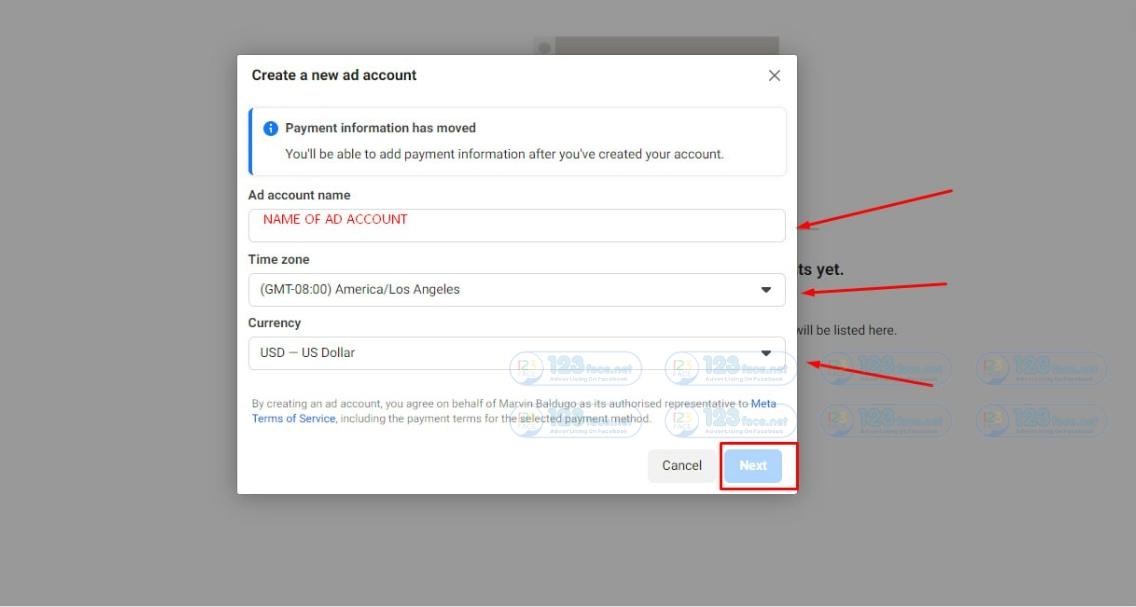
Step 5: Submit and Create Account
- Review your details, then click "Create Ad Account" to finalize the setup of your new ad account.
Adding People to Your Facebook BM Ad Account
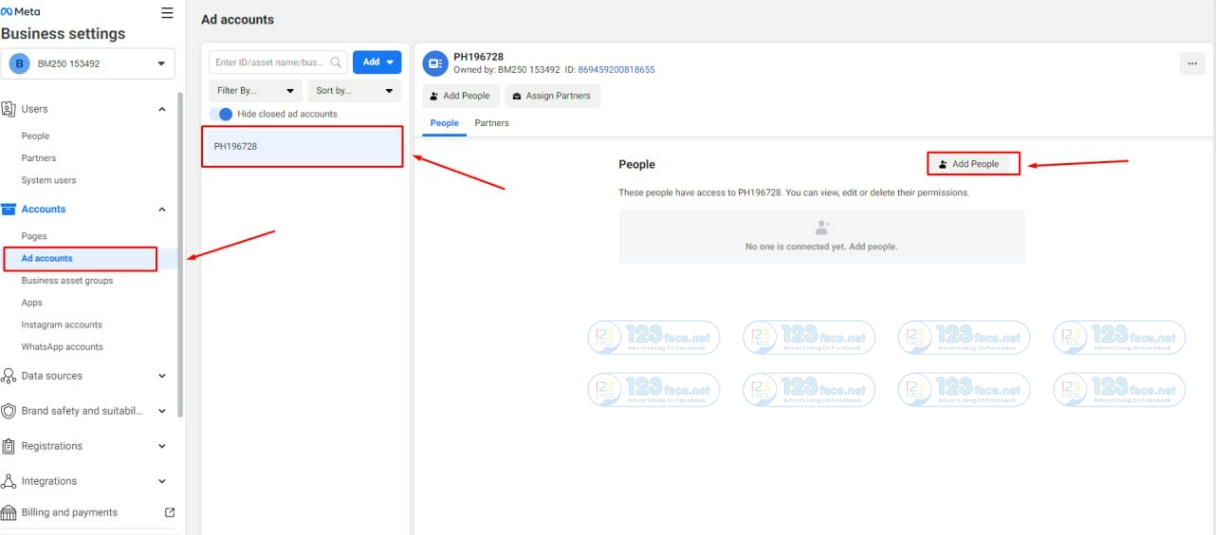
Step 1: Navigate to 'Ad Accounts'
- In Business Settings, stay in the “Ad Accounts” section where you've created your new ad account.
Step 2: Select Your Ad Account
- Find the ad account to which you want to add people and select it.
Step 3: Add People
- Click on “Add People” and enter the name or email address of the person you want to add to your ad account.
Step 4: Assign Roles
- Choose a role for each person you add. You can select from "Ad account admin," "Ad account advertiser," or "Ad account analyst." Each role has different levels of access and permissions.

Finalizing the Process
- Once the individuals accept their invitations, they'll have access to your ad account with the permissions you’ve set.
Tips for a Smooth Process
- Review Permissions: Make sure to review the permissions associated with each role carefully to maintain control over your ad account.
- Use Work Emails: It’s best to use work emails when adding individuals to ensure professional management of your ad account.
- Regularly Audit Access: Periodically review who has access to your ad account to ensure all users are current team members and have the appropriate level of access.
4, Pages (Create Fanpage in business manager, add existing Fanpage to business manager, add Fanpage admin in business manager)
I have a detailed article, please see the attached link: https://123face.net/client/blog/instructions-for-creating-fanpage-and-adding-fanpage-to-the-business-management-bm-
5, Data source (pixel) (create, share)
I have a detailed article, please see the attached link:https://123face.net/client/blog/instructions-for-logging-in-to-facebook-hotmail-and-getting-recovery-email-code-getnada-new-
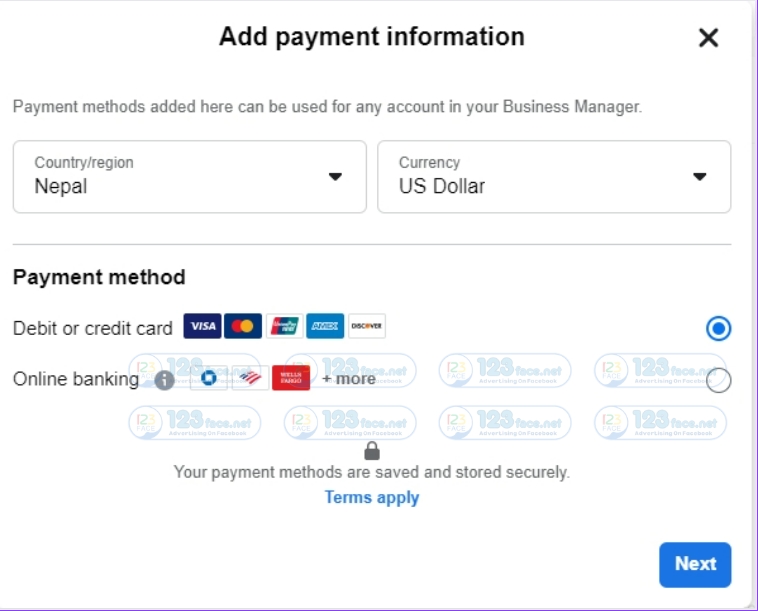
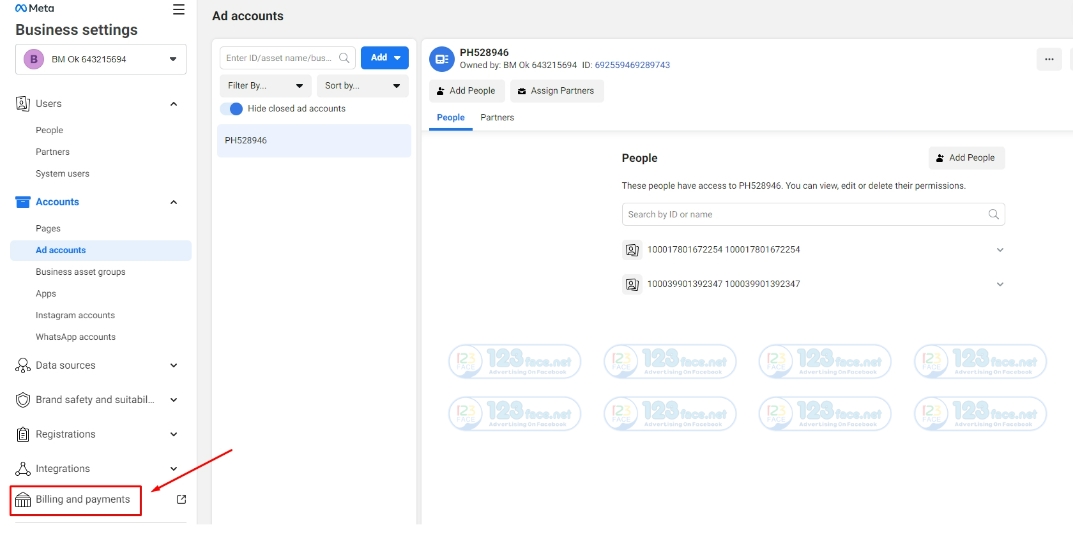
6,Payment (add card to BM, Add card from BM to advertising account)
Adding a Payment Method to Facebook Business Manager
Step 1: Navigate to Your Business Manager Settings
Go to the Payments Section

Step 2: Click Payment mothods > Add
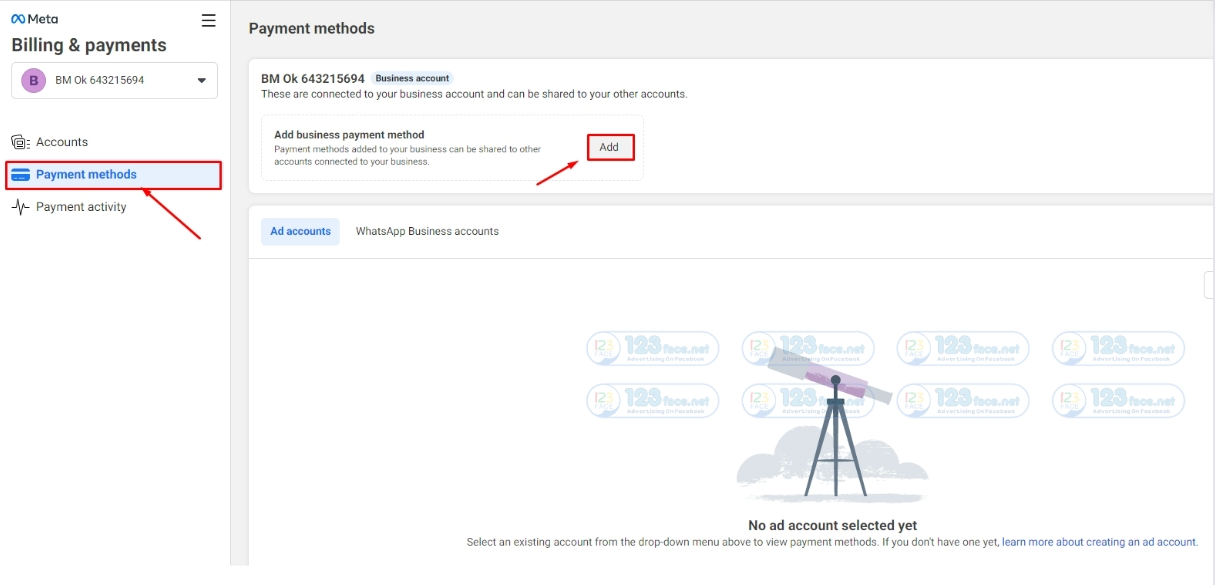
Step 3: Simply choose the one that's right for you and fill in your payment card information as usual
Add card from BM to advertising account
Step 1: Navigate to Your Business Manager Settings
- Log into your Facebook Business Manager account.
- Go to 'Business Settings' by clicking on the gear icon.
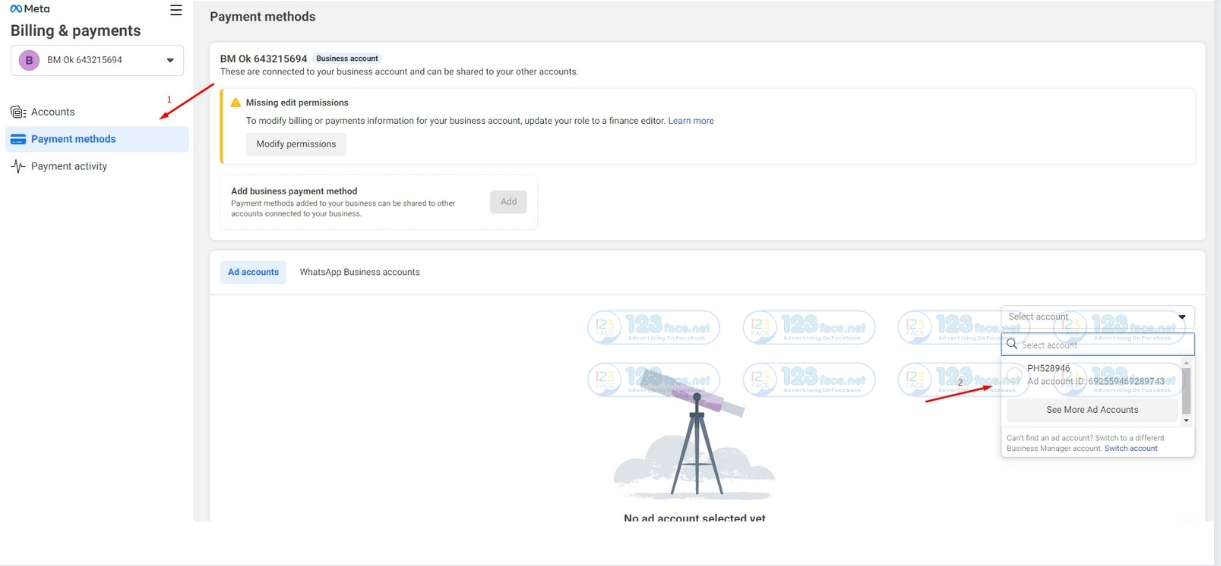
Step 2: Go to the Payments Section
- In the Business Settings menu, find the 'Payments' option under the 'Billing' section.
Step 3: Add Payment Method
- Click on 'Add Payment Method.'
- Choose 'Credit or Debit Card' and enter your card details.
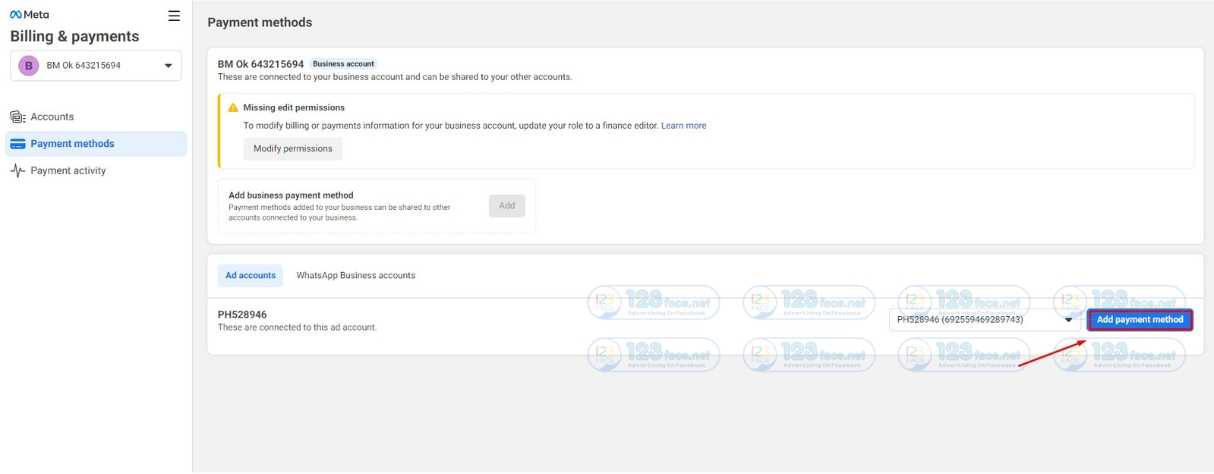
Step 4: Save Your Card Information
- After entering your details, click 'Save.' Facebook may ask for additional verification to confirm the payment method.

- Instructions on how to get the Link to share administrative rights in the business manager
Step 1: Send Invitations to Prospective Business Managers
To get started, you must first invite the individuals you want to have administrative rights in your BM.
- If you're unsure how to add a new administrator in BM, please refer to our comprehensive guide: Adding Administrators in BM Instructions.
This guide will walk you through the process of sending invites directly from the Business Manager.
Step 2: Accepting the Invitation
Once an invitation is sent, the recipient will need to check their email for the invitation from Facebook.
- Log in to the email account where you received the invitation.
- Follow the visual instructions provided in the email to accept the invitation.
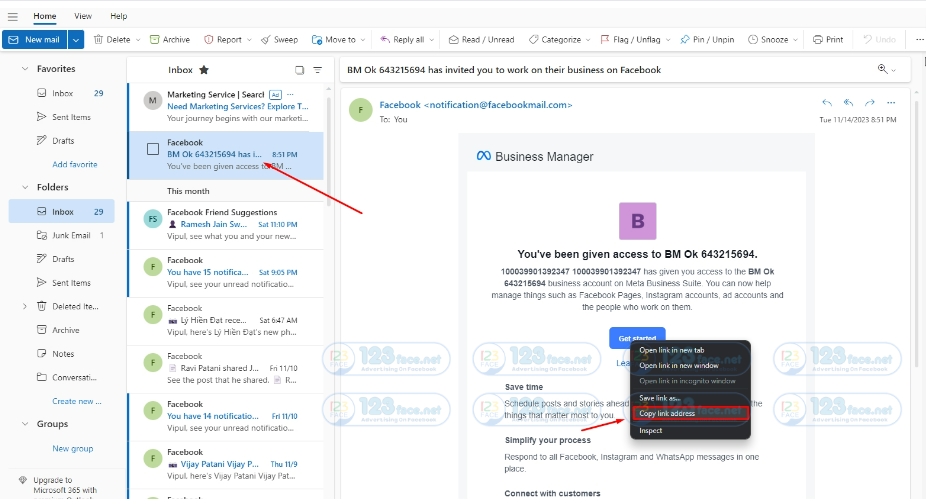
Copying and Storing the Invitation Link
After accepting the invitation, you'll be able to copy the invitation link.
- Copy the link provided in the email.
- Paste it into any secure folder for storage, or you may choose to send that link directly to anyone else who wishes to receive administrative access to the BM.
Example of an invitation link: https://fb.me/2QegiWCD5WTsH7h
How to Exit a Facebook Business Manager: A Step-by-Step Guide
Navigating your professional affiliations on Facebook can sometimes mean you need to leave a Business Manager. Whether you're changing roles or simply cleaning up old accounts, exiting a Business Manager is straightforward. Follow these steps to remove yourself from a Business Manager on Facebook.
Step 1: Access Business Manager
- Open your browser and log in to your personal Facebook account at business.facebook.com.
Step 2: Enter 'Business Settings'
- On the main Business Manager dashboard, click the gear icon in the upper right corner to access 'Business Settings'.
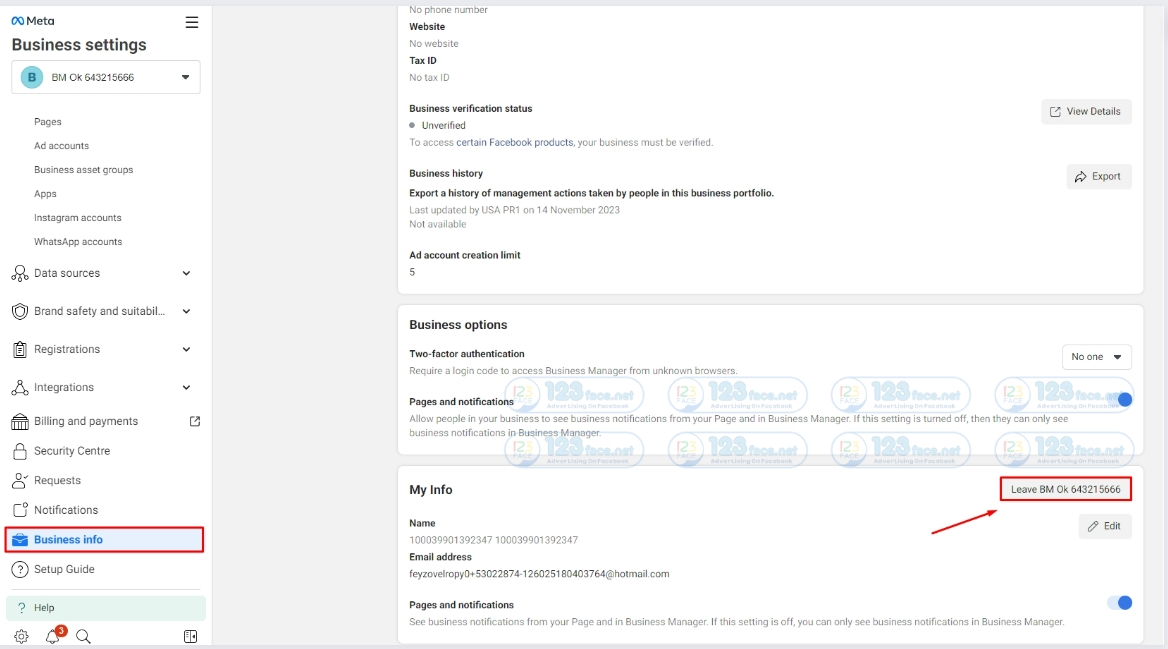
Step 3: Select 'Business Info'
- In the left-hand menu, find and select 'Business Info' to view detailed information about the Business Manager you're a member of.
Step 4: Locate the 'Leave Business' Option
- Scroll to the bottom of the 'Business Info' page, where you'll find the option 'Leave Business'. Click on this.
Step 5: Confirm Your Action
- Facebook will ask you to confirm that you want to leave the Business Manager. If you're sure, click 'Leave' to proceed.
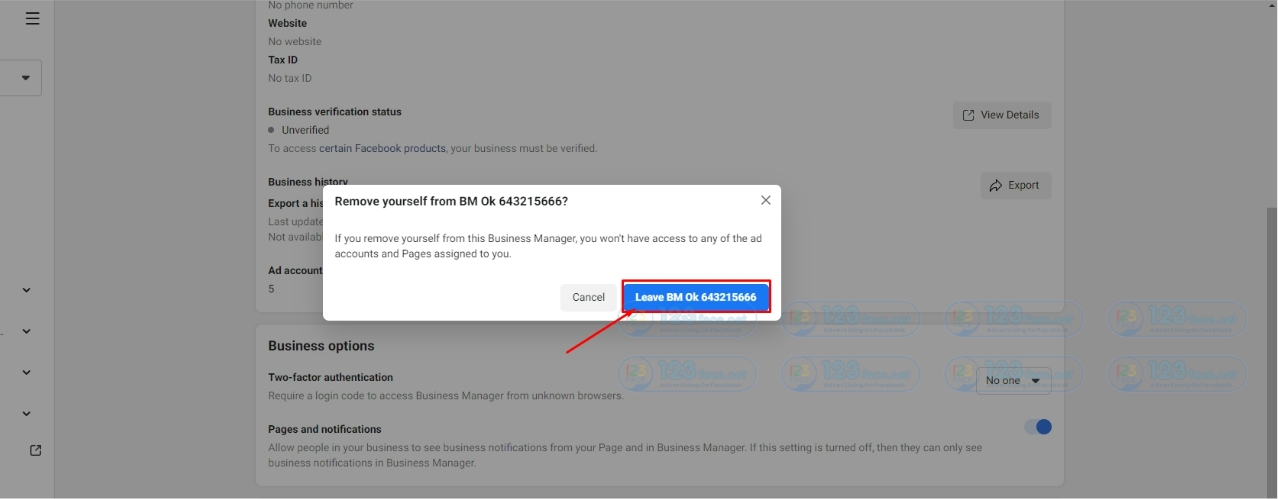
Step 6: Complete the Process
- After confirmation, Facebook will process your request, and you will be removed from the Business Manager. You will no longer have access to any resources, ad accounts, pages, or other assets within that Business.
Considerations When Leaving Business Manager
- Ensure all necessary tasks are completed before leaving the Business Manager.
- If you're the sole admin, consider transferring your administrative duties to someone else before leaving.
- Once you leave, you will need to be re-invited if you wish to manage or access resources in that Business Manager again.