Instructions for adding domains to BM
Writing date: 2023-11-08 14:26:39
A Step-by-Step Guide to Adding Your Domain to Facebook Business Manager
Unlocking the Power of Facebook Business Manager: How to Add Your Domain
Integrating your domain into Facebook Business Manager (BM) unlocks a suite of powerful marketing tools and verification benefits. Whether you're looking to streamline your branding efforts, run dynamic ads, or create a trusted online presence, adding your domain to BM is a crucial step. This comprehensive guide will navigate you through the process, ensuring that your domain is properly connected to your Facebook business assets.
The Importance of Adding Your Domain to Facebook BM
Securing Your Brand's Identity
By verifying your domain with Facebook Business Manager, you assert ownership of your brand's online space. This verification process not only protects your domain but also enhances the credibility of your business across Facebook's platforms.
Step-by-Step Instructions for Adding a Domain to Facebook BM
Illustrated images
Step 1: Access Your Business Manager Settings
- Log into your Facebook Business Manager account.
- Navigate to 'Business Settings' from the main menu.
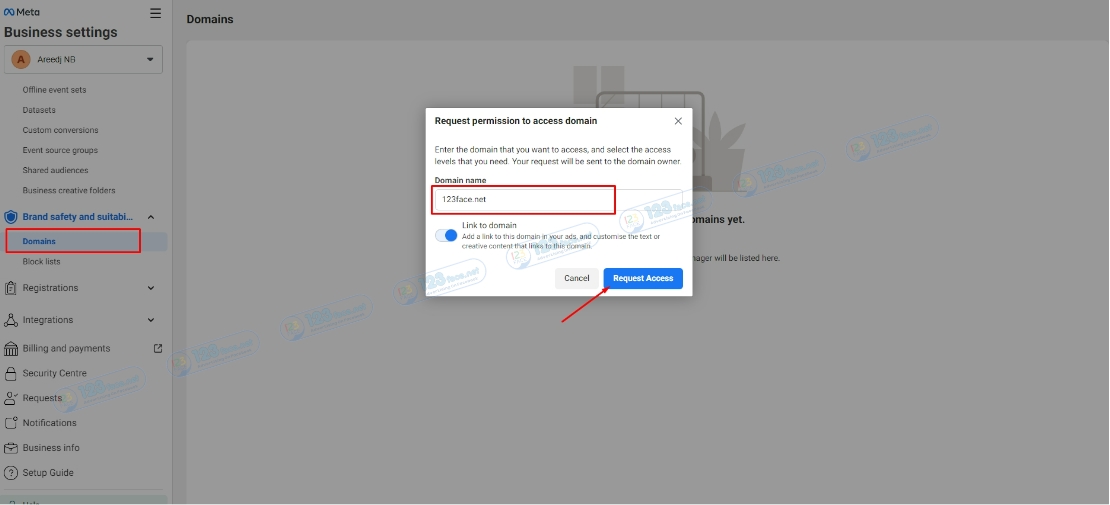
Step 2: Go to the Brand Safety Section
- Within Business Settings, find and select 'Brand Safety' from the left-hand side menu. Here you will see the option for 'Domains.'
Step 3: Add Your Domain
- Click on the 'Domains' section and then the 'Add' button to start the process of adding your new domain.
- Enter your domain in the provided field without any prefixes (e.g., "https://" or "www").
Step 4: Verify Your Domain
- Once you've added your domain, you will need to verify it to prove ownership. Facebook offers several verification methods, such as DNS verification, HTML file upload, or meta-tag verification.
- Follow Facebook's provided instructions to complete the verification process for your domain.
Tips for a Smooth Domain Integration
Prepare Your DNS Records
- If you opt for DNS verification, ensure you have access to your hosting provider's DNS settings to add the TXT record provided by Facebook.
Check for Access Permissions
- Verify that you have the necessary admin permissions to make changes to your domain settings within BM.
Keep Records of the Process
- Document each step of the verification process in case you need to troubleshoot or provide evidence of ownership.
Conclusion: Establishing Your Business's Digital Foundation
Adding and verifying your domain with Facebook Business Manager is more than just a technical requirement; it’s a strategic move that fortifies your brand's integrity and opens up advanced advertising capabilities. By following this guide, you can ensure that your domain is successfully added, setting the stage for a more controlled and cohesive digital marketing strategy.
For more insights on leveraging Facebook Business Manager and enhancing your online marketing, follow our blog for the latest tips and trends.